
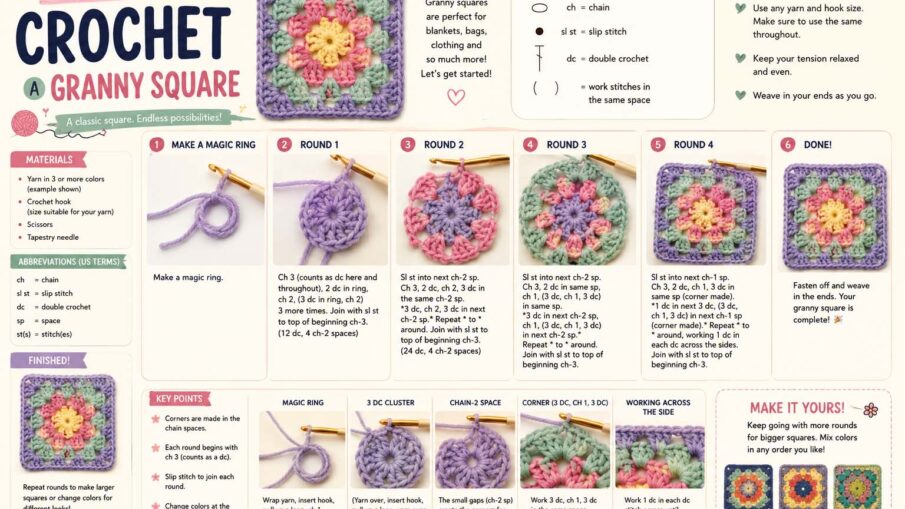
Crocheting is a portable and creative hobby that works well at home or while traveling. If you are learning how to crochet a granny square, you can start with a small amount of yarn, a suitable crochet hook, scissors, and a yarn needle. A classic granny square uses repeating groups of double crochet stitches worked in rounds, with chain spaces forming the corners.
Once you understand the basic pattern, you can make individual squares in different colors and sizes. Then, you can join them to create blankets, bags, scarves, pillows, clothing, and other crochet projects.
Why Granny Square Crochet Is Beginner-Friendly
Granny squares are useful practice projects because they introduce several basic crochet techniques in a small format. For example, beginners can practice chain stitches, double crochet, slip stitches, working in rounds, and maintaining consistent tension.
The repeating structure also makes the pattern easier to remember after a few rounds. Therefore, you can focus on improving stitch control instead of constantly learning new techniques.
Travelers may also enjoy granny squares because each piece remains compact. You can work on one during a train journey, at a hotel, or while relaxing during a trip.
Materials You Need to Crochet a Granny Square
Before starting your first granny square, gather a few basic supplies:
- Crochet hook
- Yarn
- Scissors
- Yarn needle
For beginners, a smooth medium-weight yarn can make individual stitches easier to see and handle. However, always match your crochet hook appropriately to the yarn you choose.
The yarn label usually provides useful information about yarn weight and a recommended hook-size range. Therefore, checking the label gives beginners a practical starting point.
The Craft Yarn Council crochet standards also provide standardized information about yarn weights, crochet abbreviations, hook sizes, symbols, and project skill levels.
If you plan to crochet during a trip, keep the supplies together in a small pouch. Knowing how to pack a suitcase can also help you organize yarn and other travel essentials without taking unnecessary space.
How to Crochet a Granny Square Step by Step
A traditional granny square starts in the center and expands outward in rounds. The basic design uses groups of double crochet stitches separated by chain spaces.
The instructions below use common U.S. crochet terminology.
Step 1: Make a Slip Knot
Start by creating a slip knot and placing it on your crochet hook.
Keep the loop secure but not excessively tight. Your hook should move through it comfortably.
Step 2: Create the Center Ring
Chain four stitches. Then, insert your hook into the first chain and join with a slip stitch to form a small ring.
You will work the first round into the center of this ring.
Step 3: Crochet the First Round
Chain three. For this basic pattern, the beginning chain three counts as the first double crochet.
Next, work two double crochet stitches into the center ring. You now have your first three-stitch cluster.
Chain two to create the first corner space.
Then, work three double crochet stitches into the ring and chain two again. Repeat this process until you have four groups of three double crochet stitches separated by four corner spaces.
Finally, join the round with a slip stitch into the top of the beginning chain.
Step 4: Build the Four Corners
The chain spaces from the first round create the four corners of the granny square.
For the next round, move to a corner space. Then, work a group of three double crochet stitches, chain two, and work another group of three double crochet stitches into that same corner.
This combination creates a new corner while allowing the square to grow outward.
Repeat the process at each of the four corners.
Step 5: Continue Adding Granny Square Rounds
As your square becomes larger, you will see spaces between the corner groups.
Work three double crochet stitches into each side space. Meanwhile, continue working two three-double-crochet groups separated by a corner chain space at every corner.
Each additional round creates more side spaces. Therefore, the number of stitch groups increases as the granny square grows.
Continue until your square reaches the size you want.
Step 6: Fasten Off and Weave In the Ends
After completing the final round, cut the yarn while leaving a short tail.
Pull the yarn tail through the remaining loop and tighten it gently to fasten off.
Finally, thread the loose yarn onto a yarn needle and weave it securely through nearby stitches. Trim any remaining excess after securing the end.
Beginner Tips for Crocheting Granny Squares
When learning granny square crochet, focus on consistency rather than speed. Your first few squares may not look identical, and that is normal.
Beginners should focus on:
- Learning the basic stitches
- Maintaining comfortable yarn tension
- Identifying corner spaces
- Counting stitch groups
- Keeping the square flat
- Practicing the same pattern several times
In addition, stop occasionally and inspect the shape. If the square begins to curl, twist, or develop an unexpected number of sides, check the previous round before continuing.
Watching demonstrations while practicing can also help beginners understand hand positioning and stitch placement.
Understanding Common Granny Square Crochet Terms
Crochet patterns often use abbreviations, so learning a few basic terms makes instructions easier to follow.
Common U.S. abbreviations include:
- ch — chain
- dc — double crochet
- sl st — slip stitch
- sp — space
- rnd — round
- st — stitch
A granny square usually involves working in rounds rather than back-and-forth rows. Therefore, understanding how rounds and chain spaces work will make many granny square patterns easier to follow.
Changing Colors in a Granny Square
One reason granny squares remain popular is their flexibility with color.
You can crochet the entire square in one color or change yarn after each round. For example, you might use three or four complementary colors to create a traditional multicolored design.
To change colors, fasten off the previous yarn at the end of a round. Then, join the new yarn in a suitable chain space and continue the pattern.
However, remember to weave in the yarn tails securely. Multiple color changes can create many loose ends if you leave them all until the project is finished.
Crochet Tension and Square Shape
Consistent tension helps a granny square stay neat and balanced.
If your stitches are extremely tight, the square may become stiff or curl. On the other hand, very loose stitches can create larger gaps and an uneven appearance.
Try to hold the yarn with enough control to create similar-sized stitches without pulling excessively.
Also, pay close attention to the corners. Missing a corner or adding an extra one can quickly change the shape of the project.
With practice, maintaining even tension becomes easier and more natural.
How to Crochet a Granny Square Blanket
After learning the basic square, you can use the same technique for a blanket.
First, decide how large you want each square to be. Then, make enough squares to create the approximate width and length of your planned blanket.
You can use identical colors for every square or create a varied color scheme.
Next, arrange the finished squares on a flat surface before joining them. This step helps you decide where each color or pattern should appear.
Finally, join the squares using an appropriate crochet or sewing technique and weave in the remaining ends.
Travelers can make individual squares during separate trips and assemble the blanket later at home. As a result, the project stays compact while traveling.
Some people also choose yarn colors inspired by places they visit. Those wondering where to find inspiration can use landscapes, architecture, local art, and travel memories as creative starting points.
Travel Destinations for Crochet and Craft Lovers
Travel and crochet can work well together, especially for people who enjoy slower and more creative trips.
Mountain and Cabin Trips
Cool weather and quiet evenings provide plenty of time for small craft projects. Therefore, a granny square can be an easy project to work on after a day of sightseeing.
Beach Destinations
A small crochet project can also fit into a relaxing beach holiday. However, keep yarn protected from sand, moisture, and sunscreen.
Cities With Craft Shops and Markets
Some travelers enjoy visiting local yarn shops, textile markets, and craft stores. These places can offer colors and fibers that provide inspiration for future projects.
Craft Events and Workshops
Craft workshops and fiber-related events can also add a creative element to a trip. Before traveling, check event schedules and registration requirements directly with organizers.
Best Times to Travel With Crochet Projects
Crochet works throughout the year, but some trips provide more natural downtime for crafting.
Winter Travel
Cold evenings often encourage indoor activities. Therefore, travelers deciding where to travel in winter may enjoy packing a small crochet project.
Rainy Travel Days
Bad weather can interrupt outdoor plans. In that case, having yarn and a crochet hook gives you a simple indoor activity.
Long Flights and Train Journeys
Long journeys also provide potential crafting time. However, transport and security rules can vary, especially for scissors and other tools.
Therefore, check the current rules of your airline, airport, railway operator, or destination before packing crochet equipment.
Shopping for Yarn While Traveling
Yarn shopping can become part of a craft-focused trip. Local yarn stores, artisan markets, and textile shops may offer fibers, colors, or handmade products that reflect regional traditions.
However, prices vary by destination and material. Instead of assuming tourist areas always cost more, compare several shops when possible.
Also, consider luggage space before buying large quantities of yarn. A few carefully selected skeins may be easier to transport than an entire project’s supply.
If the yarn has a dye lot, buying enough for your intended project at one time can help reduce unwanted color variation between batches.
Common Granny Square Mistakes to Avoid
Beginners often make small mistakes while learning, but most are easy to identify.
Missing a Corner
A traditional square needs four corners. Therefore, count them after each round.
Adding Extra Stitch Groups
An extra cluster can make one side wider than the others. If the square begins to look uneven, compare each side before starting another round.
Uneven Yarn Tension
Large changes in tension can affect the size and appearance of the stitches. Instead, aim for comfortable and consistent yarn control.
Working Into the Wrong Space
Traditional granny squares rely heavily on chain spaces. Therefore, check whether the pattern asks you to work into a chain space or a stitch.
Forgetting to Weave In Ends
Loose yarn tails can become inconvenient when you assemble multiple squares. Weaving them in as you complete the project can keep the work organized.
Travel Tips for Crocheters
A little preparation makes crochet easier to manage while traveling.
Keep yarn in a separate pouch or project bag to reduce tangling. Also, bring only the amount of yarn you expect to use during the trip.
Small projects work particularly well because they take up less luggage space. Granny squares, coasters, and simple motifs can be practical options.
Before flying, check current security rules for crochet hooks, scissors, yarn needles, and other crafting tools. Rules can vary by country and airport.
You can also save your crochet pattern or tutorial for offline use. As a result, poor internet access will not interrupt your project.
FAQ About How to Crochet a Granny Square
Is a Granny Square Good for Beginners?
Yes. A basic granny square uses repeated stitches and simple rounds, making it a practical project for practicing fundamental crochet techniques.
What Stitches Do I Need for a Granny Square?
A traditional granny square commonly uses chain stitches, double crochet stitches, and slip stitches. More advanced variations may use different stitch combinations.
How Long Does It Take to Crochet a Granny Square?
The time varies according to the square’s size, yarn, hook, pattern, and your experience. Therefore, beginners should focus on accurate stitches rather than trying to meet a specific completion time.
Can I Crochet While Traveling?
Yes, crochet is portable and requires relatively little equipment. However, always check transportation and security rules before packing hooks, scissors, needles, or other tools.
What Can I Make With Granny Squares?
You can join granny squares to create blankets, scarves, bags, pillows, garments, and many decorative projects.
How Do I Crochet a Granny Square Blanket?
Make multiple granny squares, arrange them into your preferred layout, and join them with a suitable crochet or sewing method. Then, weave in the remaining ends and add a border if your chosen design calls for one.
Conclusion
Learning how to crochet a granny square gives beginners a practical way to develop basic crochet skills while creating something useful. The pattern starts with a small center ring and expands through repeated groups of double crochet stitches and corner spaces.
Once you understand the structure, you can experiment with different colors, yarns, sizes, and projects. You can also make individual squares while traveling and join them later into larger pieces.
Most of all, focus on consistent tension, four clear corners, and accurate stitch placement. With regular practice, the repeating granny square pattern becomes easier to recognize and crochet.